


Installing a Twin Wall Flue Chimney System
5 mins
How to Design and Install a Twin Wall Flue Chimney System
Welcome to the longest page in the Stovefitter's Manual! This article will guide you through everything you meed to know to install a clip-together chimney system. We start with a six-minute design video, progressing on to our FAQ, kits for sheds and conservatories, components and finally onto the install: inside or outside the house.
Some day I may break this article down into shorter standalone offerings - but for now grab yourself a large coffee and settle into to your comfiest chair...
Chimney design video
6 minutes


Sheds, shacks and gazebos...
FAQ
What is twin wall chimney flue?
Twin wall flue is is a clip-together chimney system enabling solid fuel appliances to be added almost anywhere in a property. The chimney allows combustion gases to exit a property. The name derives from the chimney being constructed of two layers of metal with insulation between the layers. No adhesives or sealing materials are required at joints - an installer slides one part into another and adds a locking band to secure two parts together. No brick or stone chimney is required.
Are there different quality brands of twin wall flue on the market?
There are different levels of quality on the market, some good and some not so. Look for strong and well designed brackets as a first indicator of quality. Also check what material the twin wall is made of - a good quality stainless steel is required.
I have seen sagging brackets, discolouration and rust. Like many things in life you get what you pay for.
Duraflue Twin Wall was launched to the market during 2014 and, due to its high quality and innovative design, is already a favourite amongst professional stove fitters. Brackets are strong and adjustable whereas other brands may be spindly and impossible to adjust. Do it once - do it good.
Can my chimney design be created by an expert - to Building Regulations standards?
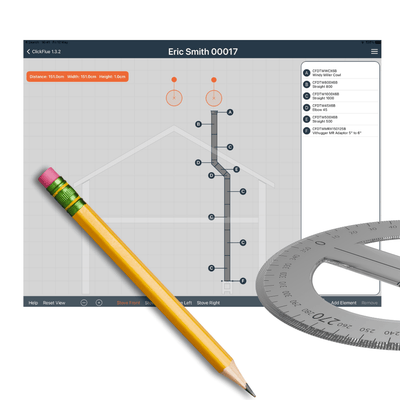
Yes and it is what we recommend. Many companies offer some sort of design service. Take advantage of our FREE chimney design service - we have a full-time designer who only performs this role in the company and is therefore a bit of an expert. He uses our own software designed at great expense that is accurate almost to the mm and copes with 90% of property variations.
Feel free to email your design sketch to us for our initial thoughts.
Does my twin wall chimney require planning permission?
In the UK a twin wall chimney does not generally need planning permission. But you may need permission if the new chimney is on the front of a property (facing the road), in an area specified as a special zone by your local authorities or if your property is listed.
However, you must notify Building Control (your local council) prior to installing any chimney (rules in Scotland may be different please check). Building Control are not involved in planning - they are concerned with health and safety.
If a building is non-habitable (not lived in) and not attached to a main dwelling (e.g.chimney for shed, shack, home office, boat, garage etc. then notification is usually not required).
Can you cut twin wall chimney flue?
Twin wall flue pipe cannot be cut to length but adjustable lengths are available. A twin wall chimney designer needs to plan carefully when installing a twin wall flue chimney.
Why use twin wall flue rather than single skin vitreous black pipe?
Twin wall flue pipe is a metal tube (flue) insulated with approx. an inch of insulation (two layers of stainless steel with insulation between). The insulation is necessary to keep the gases hot.
Were you to use non-insulated vitreous pipe for the whole of your chimney, then the gases would likely cool too much and start to slow rather than rise with this causing the smoke underneath to “dam”. This might cause the smoke below to exit out of the vents in your stove instead of the top of your chimney.
Cooling gases also form condensation which forms on the inner walls of the flue and runs down into the stove (mixed with soot it is a disgusting brown liquid).
So keeping gases hot is good.
Note the difference between a chimney and a flue: if the chimney is a polo mint then the flue is the hole (I really enjoy that definition because I am easily amused).
Some excellent documents by the British Chimney Manufacturer’s Association on this page (really worth a look as easy to read with lots of diagrams) here.
Can I create a false chimney breast around my twin wall flue?
Want a fast and excellent method for building a false chimney breast? Use Skamol: https://www.opiesuk.co.uk/skamo-enclosure.
What outer diameter is twin wall flue and what size hole should I cut if passing through a roof?
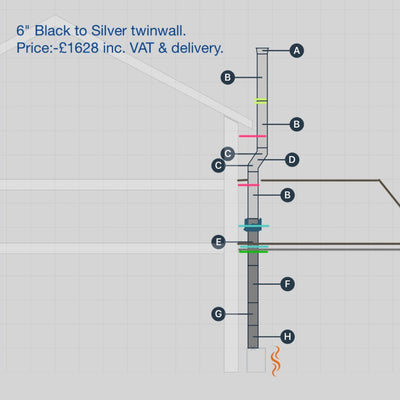
With regard to diameter, twin wall with an inner diameter of 5″ has an outer diameter of approx. 7″ whilst twin wall with an inner diameter of 6″ has an outer diameter of approx. 8″. Our twin wall flue has an exact outer diameter of 191mm (5" internal) and 217mm (6" internal).
You will most likely be fitting flue that has an inner diameter of 5″ or 6″ but check what diameter flue your stove requires. You can only fit 5″ internal diameter to DEFRA approved stoves (all of our stoves are DEFRA approved) and the manufacturer does not state 6″ as a minimum (what is a DEFRA approved stove).
Otherwise choose 6" internal (8" external). The narrower diameter 5″ (7" external) can look less obtrusive if taking it all the way down to the stove and can prove desirable if combustible materials ensure the route is difficult (for example, if the gaps between joists are close)
What size hole to cut when passing through a roof with twin wall flue?
Every brand of flue has to be kept a certain distance away from combustibles - usually 5cm or 7cm.
For Duraflue twin wall (the brand we sell): Hole size should be diameter of pipe plus 50mm air gap all round for safety (70mm all round if pipe boxed in and not open to the air). So that's 100mm extra on the diameter or 140mm extra on the diameter if passing through a boxed in area. 5" twin wall has a outer diameter of 192mm and 6" has a diameter of 217mm. You can fill the air gap with Rockwool afterwards or just leave as "air".
How close can twin wall flue be to combustible materials?
Twin wall chimneys can be surprisingly close to combustible materials (wood usually). Duratwin (the brand we sell) can be as close as 5cm (flue open to the air) or 7cm (boxed in flue) but different manufacturers' specs may vary.
What colours of twin wall flue are available?
Twin wall is generally available in silver (reflective chrome-like) and black (powder-coated matt finish). The black is a little more expensive.
If you desire to paint twin wall you would get it powder coated (never really happens).
How much does twin wall flue cost?
Quality twin wall flue is about £100 a metre (but cheap when compared to building a new chimney).
Add to this all the other parts you require such as cowls, adaptors, brackets etc. Twin wall for a shed can be as low as £500 rising up towards £1,200 to £2,000 for houses. 6" is more expensive than 5", black more expensive than silver.
Can twin wall flue be fitted inside or outside?
Twin wall flue can travel internally within a building or externally on an outside wall.
Is twin wall flue easy to install?
Twin wall flue pipe is not difficult to fit (it all clips together using locking bands); you just have to know your Doc J Building Regulations (or let us do the design for you).
Working at height can cause a problem for some people but scaffolding makes life a lot easier.

Steel vitreous pipe or twin wall pipe?
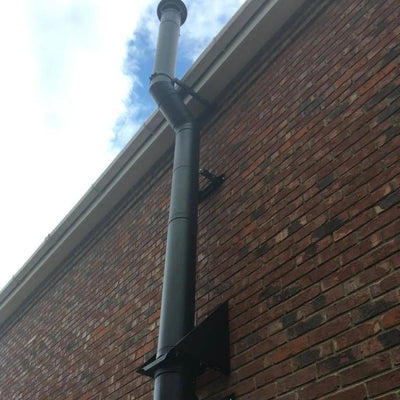
The wider diameter pipe exiting the room in the image is black twin wall flue. Underneath this is a metre of steel vitreous pipe. Both types of pipe are 5″ (inner diameter) but the black twin wall flue is 7″ external diameter as it is insulated.
You can run twin wall all the way to the stove if you wish. Some people think twin wall looks too "fat" on smaller stoves and prefer to have a metre or so of vitreous pipe to start things off. Other people prefer the twin wall all the way to the stove look. If you are not bracketing to a wall (for example if the the room is open-vaulted), then "twin wall all the way to the stove" is stronger and superior. Why? Because the joint between single skin steel pipe and twin wall pipe is just "located" and has no strength (same as vitreous to vitreous joints). One can fix this by adding self tappers to the joint but the tapper heads will be seen. This is not a problem if you can secure the twin wall in two locations using brackets (but this will not be possible if chimney is in a vaulted ceiling and away from a wall situation).
Steel vitreous stove pipe (non-insulated) is often used for the first section of pipe on top of the stove. It MUST NOT be used to go through a wall or ceiling as it is a fire hazard (except directly into a brick/stone chimney). To exit the room, whether out through a wall or through a ceiling, you must use twin wall flue pipe and then stay with twin wall flue pipe to the chimney cowl.

Distances to combustibles for stove pipe
Steel vitreous pipe has to be at least 3x its own diameter from combustible materials (less if a heat shield is used) so a 5" pipe must be 15" away from a ceiling.
Twin wall flue can be as close as 5cm to a combustible material (or 7cm if "boxed in"). These are the design specs for Duraflue (the brand we sell) - other brands may vary.
If boxing in, flue system joints must be accessible for inspection. An inspection hatch, minimum 30cm x 30cm needs to be in place, within 1.5m of any joint if that joint is hidden. This is in Building Regulations.
Twin wall flue does not have to be boxed or have guarding unless it is in a storage area e.g. cupboard or loft storage area. Hence it can be open to the air in upstairs rooms (freaks some Building Control inspectors out though).
In lofts a wood frame and chicken wire is often used to ensure nothing can rest against the flue.
Twin wall generally gets no hotter to touch than a radiator (and usually just warm to the touch, especially once a metre or two away from the stove).

How many bends can I have in my chimney?
A chimney cannot have more than four bends and a bend should not exceed 45 degrees (one exception is a 90 degree “T” off the rear of the stove).
If you are are going off the top of your stove then through a wall you will be using two 45 degree bends straight away and have two left if you need them.
Use two more to clear the eaves and that’s your maximum!
Note that coming off the back of the stove with a T is classed as, for Building Regulation purposes, equivalent to two bends even though it is actually one 90 degree bend.
Bends of 15 degrees and 30 degrees are also available (both steeper than 45 degree bends).
Why do we need the above rules? Bends slow down flue gases so the less the merrier. A slope in a chimney that is too 'flat' will likely lead to soot build-up and potential blockage.

How high should my chimney be?
The top of the chimney, in an ideal world, would be the recommended minimum 4.5m above the top of the stove as stated in UK Building regulations – but as long as the chimney works properly there is no legal minimum.
With modern twin wall flue being so well insulated a 3 metre chimney is generally accepted as being tall enough. But go higher if you can - the higher the chimney the better the draw.
A chimney should also pass the 2.3m chimney rule or be 60cm higher than the ridge of your building.
Make sure your chimney parts connect "male on top"
Flue pipes, whether steel vitreous or twin wall, are always "male on top", as in the top pipe slides into the lower pipe. This is to ensure any condensation runs down the system - eventually evaporating or entering into the stove to be consumed by the fire.
If fitted the other way around this condensation can escape at joints (and it is usually brown and horrible and would burn and sizzle making an awful stink).
With your twin wall pipe if you are unsure which end is which?
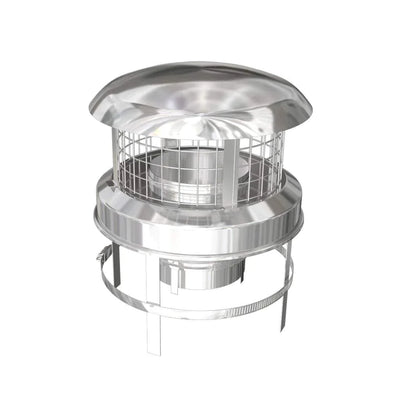
Grab the cowl - it only has a "bottom".


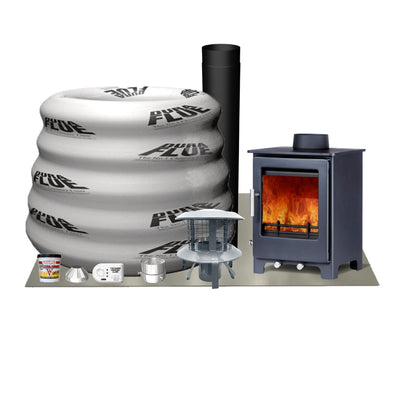
Duraflue (Duratwin) - very good kit
View all


Sheds, conservatories & kits

You might wish to keep things simple and order one of our wood stove chimney kits suitable for sheds, shacks, vans, garages, caravans, home offices etc.
No permissions or sign-offs usually required for a non-habitable building (shed/garden room, gazebo etc.).

After reading this article you might wish to read more about wood stoves in conservatories and extensions. A wood burning stove is perfect for a conservatory as these rooms can be so very cold in the winter months.
You may be able to use a shed kit (and add a little extra height if required) .
It seems to be a grey area as to whether building control sign-off is required (if DIY'ing) - ask your local council.
Create a STRONG twin wall chimney

The picture above is a DIY customer install of a twin wall chimney telescopic support. This will likely only be required if you have more than 1.8m of freestanding chimney. On my own house in Cornwall I have 1.8m of freestanding twin wall above the highest bracket and all is well despite multiple Force 10 storms. I do however have wide locking bands on the exposed joints.

Back in the days before long brackets existed we made our own using box-section steel and a welder.
Duraflue now have many adjustable strong brackets.

Our twin wall can officially go as high as 2 metres above the highest bracket (this job shows more but the householder wanted to risk it and it is still standing today. Extra locking band security will be required (wide locking bands go over narrow locking bands).

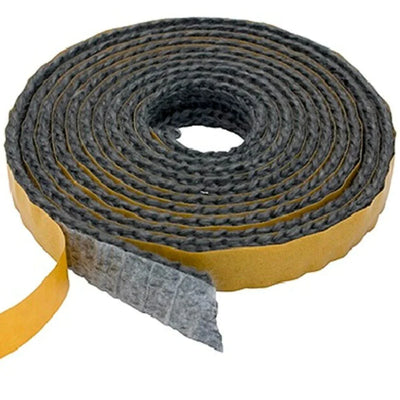
Perfect for brick, stone or block. Just drill a hole and let these little monsters wind themselves in. Perfect for screwing bracketed to walls. Different heads available (star-shaped or "nut" style).
Brick or stone: if the Thunderbolt shank is 5mm then drill a 5mm hole.
Block: if the Thunderbolt shank is 5mm then drill a 4mm hole as block is a little more "crumbly".
Do a test or two first.

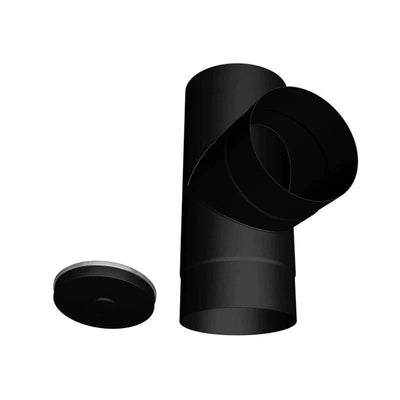
Vitreous pipe needs no connecting locking bands, screws or glues/cements.
Each joint in a twin wall system is fixed with a narrow locking band.
To add extra strength to a joint you can also choose to add a wide locking band on top of the narrow locking band. Most likely place for this treatment is the first joint above the highest bracket.

Up to 1.8m of unsupported twin wall is fine. Up to two-metres if wide locking bands are used at the necessary weak point. Above this you need telescopic leg supports (guy wire bracket plus telescopic legs).
Base support brackets are used when the weight of a number of lengths of twin wall might cause standard brackets to sag under the weight.
Ensure your stove is removable

Ensure your stove is removable
It is mentioned in Doc J of building regulations that you be able to remove the stove without dismantling the chimney.
One fitter said to me “if the legs can come off the stove then one can remove a stove by unbolting the legs and dropping the stove so that gets around it”.
Another fitter says “just cut through the vitreous and remove the stove and the chimney ” (re-fitting would then require an adjustable).
Another fitter told me to get a life and ignore it :-0
I reckon "cutting the vitreous" is so easy that this will suffice. If fitting twin wall alI the way to the stove I would add a removable section. At the end of the day ask whoever is signing it off.
Let us look at some key twin wall components


Adjustable brackets: 90-135mm, 130-210mm, 225-385mm, 370-590mm, 550-770mm. Corner brackets also available.

Roof/rafter support for securing chimney to a flat surface or to rafters. Angle is adjustable for loft rafters.

Ventilated firestop support unit for passing through a floor from one room to another. Ensures floor space is ventilated and keeps Building Control happy.

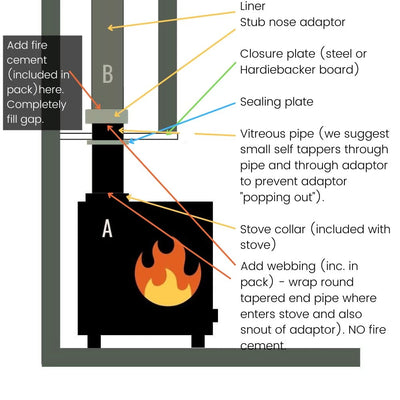
Single to twin wall adaptor: is always the lowest twin wall part.
This part can sit directly onto the stove (inserts into collar) or slides inside single skin vitreous pipe. Use fire cement around snout or fireproof webbing (webbing best!).

Sit one of these atop your stack and continue on in twin wall.
Hang a chimney liner off the bottom, attached by a Jubilee clip.
Article here: chimney stack ends in lot
Typical install: twin wall flue to outside the property (off top of stove)

NOTE: Some Building Control inspectors request the hole is lined with a metal sleeve. Part available here.
There are various external routes one can choose so I have just picked the most common - off the top of the stove and out through the wall. See the diagrams below for other variations.
It is good practice (but not legally required), if possible, that the first length of pipe exiting the stove does not have any bends for the first 600mm (500mm pipe then a 45 degree elbow is fine). Theoretically this assists flue draft. This does mean that any hole in a wall is high, but luckily it usually looks good at this height (in art and design there is something called the "rule of thirds" which suggests that the flue should exit a third from the floor or one third from the ceiling).
More than 600mm is fine but no more than 2000mm of steel vitreous pipe should be used to prevent the gases cooling (insulated twin wall pipe keeps those gases hot).
If your flue is off of the rear of the stove (on a 45 degree pipe to outside) then less of your pipe is seen in the room. I prefer coming off the top as the draft is somewhat better but both can work fine (off the back can mean the stove draw is less and the stove is more difficult to light without getting a little smoke in the face during lighting).
Check out the different methods you can use below. The drawings show the typical dimensions required for a design to be created. We can create your design if you wish (usually best).


Vitreous steel pipe
The most common method of fitting a twin wall system involves using vitreous steel pipe for the first section “off the stove” with a change to twin wall just before exiting the room (via the ceiling or wall).
It is not the only way though – one can take the twin wall all the way to the stove if one wishes. Twin wall all the way to the stove can look a little “fat” depending on stove size, this due to the extra diameter but it does make for a very strong chimney and advisable if limited bracketing points available (e.g. vaulted ceiling).
How to make a hole through the wall for twin wall flue
Back to the “off the top” method the best approach is to assemble your stove on its hearth with a minimum length of 500mm pipe on top and a 45 degree elbow on top of that (the two combined provide your 600mm height). From this mockup we can project the route of the 45 degree flue and mark on the wall where the centre of the hole will be.
Drill a pilot hole first using a very long masonry bit (I use a 15mm bit about 3 ft. long attached to an SDS drill – Silverline, at the time of writing, do a set of three super-long long masonry-bits for under £25). To ensure you are at 45 degrees use a longish spirit level with the 45 degree facility (ideally a friend holds the spirit level close to your drill bit whilst you are drilling).
Or do what one of our customers (Nick G) did - created a "jig" (see image).
Once you have your hole you can just follow it with an SDS breaker with hammer chisel function making the hole gradually larger until you are happy.


Clearing the eaves
The offset to clear the eaves may or may not be required depending on the severity of your eaves.
The two elbows at eaves height are 45 degrees (15 degree and 30 degree elbows are also available) and we have a short length (250mm) of twin wall pipe between them due to the depth of these eaves.
Note that I could also have used a 500mm or even a 1000mm between the two elbows. One can then just twist the bottom elbow to bring the upper vertical section back to close to the eaves (looking at the house end on you would then see a dog leg to the right (or left if you twist the other way).
In effect you have a dog leg to clear the eaves AND a dog leg left or right.
If you understand the hell what I’m burbling on about you will see that, as long as your offset is longer rather than shorter, it is hard to go wrong when striving to clear the eaves as “a little bit of a twist” will sort it out.
Note that the highest bracket should be above the offset.
Some fitters do not fit Base Support Brackets (to save money). The base support is shown at the foot of the image.
I used to be the same. Then I ran into problems with one job where I used “long adjustable brackets” as the flue needed to be “away from the wall” by quite a lot. As I progressed skywards the brackets started to sag. Lesson learned.

Protect your twin wall pipe
In the majority of installs the section of twin wall through the wall will be adjustable.
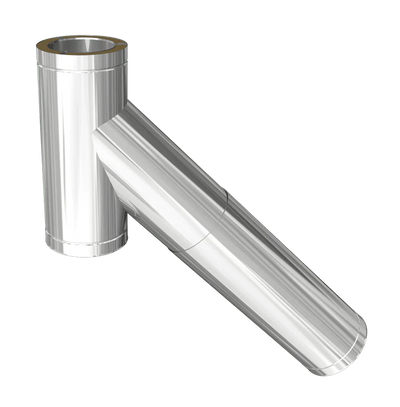
My favourite is 135 Degree T With Long Adjustable Snout as it has the smoothest transition between the two parts. You can also choose to purchase a Short 135 degree T and add a fixed or adjustable length to it. If a joint ends up within the wall, as it invariably will, don't worry about it.
Before you slide your expensive bit of twin wall flue through your wall you may temporarily want to insert heavy-duty cardboard or old carpet inside the cavity or find another way to protect your twin wall pipe. If you do not do this your pipe, especially if black, will be scratched and your partner will say you are a muppet.
You might decide to use a metal sleeve through the wall. Any gaps around the sleeve can be filled with mortar. Note that most fitters do not use a sleeve but just push the pipe through and fill the gap with a mortar/vermiculite mix even though Building regulations state that there should be a sleeve "if the pipe is likely, through heat expansion, to damage the building or the pipe".
I have used a sleeve on some jobs and not on other jobs. If not using a shield I fill the gap between the pipe and the building with Rockwool insulation (available from many merchants but it MUST be Rockwool brand as other brands are not fireproof). My thoughts here are that, as there is no expansion issue, no sleeve is required.
Note that adjustable parts are provided with extra insulation for inside the twin wall as when you extend a part you create a cavity within the part.
Through and out
The offset to clear the eaves may or may not be required depending on the severity of your eaves.
In our image (black pipe against brick) the two elbows at eaves height are 45 degrees (15 degree and 30 degree elbows are also available) and we have a short length (250mm) of twin wall pipe between them due to the depth of these eaves.
Note that I could also have used a 500mm or even a 1000mm between the two elbows. One can then just twist the bottom elbow to bring the upper vertical section back to close to the eaves (looking at the house end on you would then see a dog leg to the right (or left if you twist the other way).
In effect you have a dog leg to clear the eaves AND a dog leg left or right.
If you understand the hell what I’m burbling on about you will see that, as long as your offset is longer rather than shorter, it is hard to go wrong when striving to clear the eaves as “a little bit of a twist” will sort it out.
Note that the highest bracket should be above the offset.


Base support brackets are important
Some fitters do not fit Base Support Brackets (to save money).
I used to be the same. Then I ran into problems with one job where I used “ long adjustable brackets” as the flue needed to be “away from the wall” by quite a lot.
As I progressed skywards the brackets started to sag.
Lesson learned.
Typical install: twin wall flue inside the property (off top of stove)
A few key components shown below...
Running a twin wall chimney up through the property and out of the roof is standard practice and quite straightforward.
1. passing though a floor from room to room
2. passing through from a room to a loft
3. passing through a roof to outside
Of course, the first two points may not be relevant as some properties will have vaulted ceilings or be single storey with no upper floor or loft space.
Do you need brackets besides that shown on my drawing?
I say not but you can add more if you wish (not often possible if the flue is not near anything to bracket to of course).
Why do I suggest this?
Because in open-vaulted properties where a stove is in the middle of the room there are often no brackets between the stove and the ceiling.
Stovefitter's office is an old Chapel and the only two brackets are in the ceiling void some 5 metres above the stove. The chimney is strong (image at foot of this article)

Typical designs (chimney inside property)


Passing through a floor to another room
If passing through a floor from room to room you will chose a Ventilated Support Unit (pictured). This allows ventilation into the floor void and comprises three parts:
1. Top plate: sits on top of rafters or floor surface. Tabs show how close combustible material (usually wood) can be to flue pipe and act as a "stop" point.
2. Ceiling plate: screws up to ceiling.
3. Clamp ring: clamps around flue pipe and prevents pipe being able to drop downwards even if everything below it were removed.
Obviously your joists might not be conveniently spaced. In such a case you will add one or more “noggins” (extra pieces of wood) where required.
Note that when looking up at the ceiling of the lower room you will be able to see through the vents into the void. It is possible to hide this using a Masking Plate which just clips on (few people bother).


Passing from a room to a loft
If you are passing through a ceiling into a loft with no floor surface (exposed beams) then you do not need to ventilate. In this case you can add a bracket inside the loft (usually a roof/rafter support ). On the ceiling you would choose a Finishing plate.
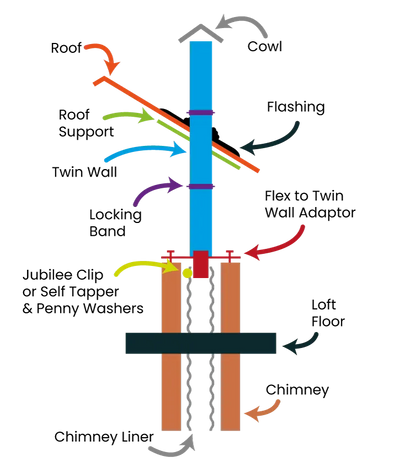
Passing through the roof with a twin wall flue
If you are passing through a weather surface (roof tiles, felt, plastic etc.) you will need a "flashing".
Simple guide:
1. Tiled surface with flat tiles: Aluminium Seldeck (cheap) or Nulead (best)
2. Tiled surface with concrete "corrugated" tiles: Nulead
3. Non-tiled surface flat or "corrugated": EDPM
Nulead moulds to uneven surfaces. Aluminium Seldeck does not.
EDPM Ezi-Seal Roof Flashing moulds to surfaces surprisingly well and no Silicon or glue is required to make the seal.
Going out through the roof is often more straightforward than it sounds and the only difficult bit is fitting the roof flashing on a tiled roof. This is where you might choose to employ a roofer (I have used a roofer in the past and paid £120 for him to fit the roof flashing that is required, not including the cost of the flashing unit). If you are happy with a bit of roofing then you might wish to do it yourself.

Planning your route
If you have two ceilings to pass through then you will likely want to position your stove directly underneath the gap between the lower ceiling joists.
This means that you still have four bends in the bank:
1. two bends for aligning to get through the second ceiling.
2. two more bends available to you should you need an offset in the attic to align the route through the gap in the roof rafters.
Note that if you have four bends in your system you MUST have a sweep point on one of the bends or on a straight between the bends.
Twin wall flue is not available with soot doors on bends.
Please watch the video below.
Chimney design video
6 minutes
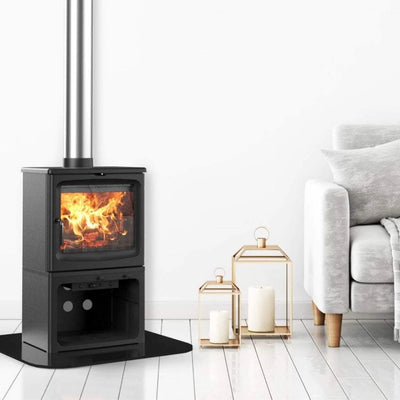
Vitreous single skin
If you look at the image of our office (it is not this tidy - this was moments before we moved into it) you can see two chimneys. The chimney at the rear is single-skin vitreous pipe for the first metre and a half, changing to twin wall just before half height. The chimney in the foreground is "twin wall all the way to the stove".
Some people prefer the narrow single-skin vitreous pipe.
But only use Vitreous pipe in your system if the twin wall is bracketed securely (at least two brackets more than a metre apart).
Why?
Vitreous pipe has no locking mechanism - one part slides into another about 2cm depth. No jointing compound, no clamp.
That chimney at the rear in our office was "wobbly" because the twin wall is only located once at roof height. Since this picture was taken an extra bracket has been fitted and all is well.
The stove in the foreground could not have been fitted using Vitreous pipe for the lower section because there was nowhere to bracket the twin wall to and make it strong.
In one continuous length, because each joint has a locking band, it is good and sturdy.

Delivery Promise
We offer 14 days from delivery to report any courier damage to your parts. If your item is damaged by the courier we will replace or refund as desired.